ShopDreamUp AI ArtDreamUp
Deviation Actions


Suggested Deviants


Suggested Collections


You Might Like…


Description
JELOUEBRIVODIIII~~~! 
He aquí un pequeño tutorial (de hecho mi primer tutorial) para estilizar la peluca de sora, en este caso. !Ahí les va!
Tutorial (ESPAÑOL)
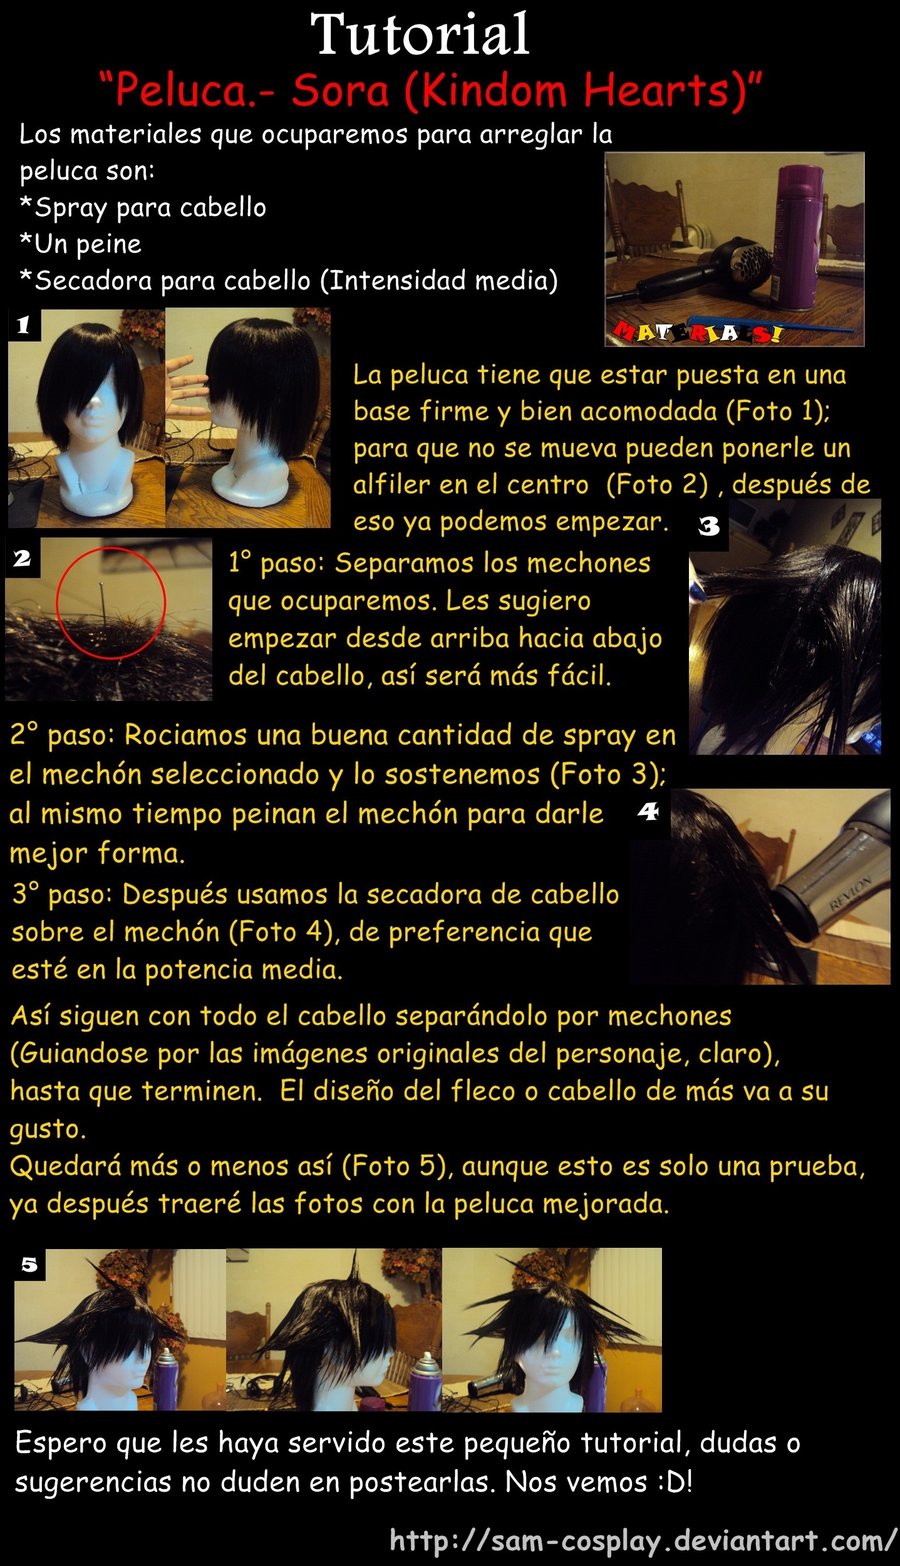
“Peluca.- Sora (Kindom Hearts)”
Los materiales que ocuparemos para arreglar la peluca son:
*Spray para cabello
*Un peine
*Secadora para cabello (Intensidad media)
La peluca tiene que estar puesta en una base firme y bien acomodada (Foto 1); para que no se mueva pueden ponerle un alfiler en el centro (Foto 2) , después de eso ya podemos empezar.
1° paso: Separamos los mechones que ocuparemos. Les sugiero empezar desde arriba hacia abajo del cabello, así será más fácil.
2° paso: Rociamos una buena cantidad de spray en el mechón seleccionado y lo sostenemos (Foto 3), al mismo tiempo peinan el mechón para darle mejor forma.
3° paso: Después usamos la secadora de cabello sobre el mechón (Foto 4), de preferencia que esté en la potencia media.
Así siguen con todo el cabello separándolo por mechones (Guiandose por las imágenes originales del personaje, claro), hasta que terminen. El diseño del fleco o cabello de más va a su gusto.
Quedará más o menos así (Foto 5), aunque esto es solo una prueba, ya después traeré las fotos con la peluca mejorada.
Recuerden, este tutorial puede servir para cualquier personaje que ocupe el cabello con éste estilo.
Espero que les haya servido este pequeño tutorial, dudas o sugerencias no duden en postearlas.
Nos vemos!


Hello everybody~~~!
Here is a small tutorial (in fact my first tutorial) for sora wig styling, in this case. ! Here we go!
Tutorial (ENGLISH)
"Wig .- Sora (Kindom Hearts)"
The materials deal to fix the wig are:
* Hair Spray
* A comb
* Hair Dryer (Current average)
The wig must be placed on a firm and well-off (Photo 1), so that no move can put a pin in the center (Fig. 2), after that we can start.
Step 1: We separate the strands that deal. I suggest starting from the top down hair, so it's easier.
Step 2: Spray a good amount of spray in the lock and hold selected (Fig. 3), while combing the hair strand to give you best.
Step 3: Then we use the hair dryer on the lock (Photo 4), preferably is in the average power.
So with all the hair are separated by strands (Guided by the original images of the character, of course) to finish. The design of the more fringe or hair is to your liking.
Be more or less like this (picture 5), although this is only a test, and then bring the photos with the improved wig.
Remember, this tutorial can be used for any person holding the hair with this style.
I hope you have served this little tutorial, questions or suggestions feel free to post them.
See ya!

He aquí un pequeño tutorial (de hecho mi primer tutorial) para estilizar la peluca de sora, en este caso. !Ahí les va!
Tutorial (ESPAÑOL)
“Peluca.- Sora (Kindom Hearts)”
Los materiales que ocuparemos para arreglar la peluca son:
*Spray para cabello
*Un peine
*Secadora para cabello (Intensidad media)
La peluca tiene que estar puesta en una base firme y bien acomodada (Foto 1); para que no se mueva pueden ponerle un alfiler en el centro (Foto 2) , después de eso ya podemos empezar.
1° paso: Separamos los mechones que ocuparemos. Les sugiero empezar desde arriba hacia abajo del cabello, así será más fácil.
2° paso: Rociamos una buena cantidad de spray en el mechón seleccionado y lo sostenemos (Foto 3), al mismo tiempo peinan el mechón para darle mejor forma.
3° paso: Después usamos la secadora de cabello sobre el mechón (Foto 4), de preferencia que esté en la potencia media.
Así siguen con todo el cabello separándolo por mechones (Guiandose por las imágenes originales del personaje, claro), hasta que terminen. El diseño del fleco o cabello de más va a su gusto.
Quedará más o menos así (Foto 5), aunque esto es solo una prueba, ya después traeré las fotos con la peluca mejorada.
Recuerden, este tutorial puede servir para cualquier personaje que ocupe el cabello con éste estilo.
Espero que les haya servido este pequeño tutorial, dudas o sugerencias no duden en postearlas.
Nos vemos!
Hello everybody~~~!
Here is a small tutorial (in fact my first tutorial) for sora wig styling, in this case. ! Here we go!
Tutorial (ENGLISH)
"Wig .- Sora (Kindom Hearts)"
The materials deal to fix the wig are:
* Hair Spray
* A comb
* Hair Dryer (Current average)
The wig must be placed on a firm and well-off (Photo 1), so that no move can put a pin in the center (Fig. 2), after that we can start.
Step 1: We separate the strands that deal. I suggest starting from the top down hair, so it's easier.
Step 2: Spray a good amount of spray in the lock and hold selected (Fig. 3), while combing the hair strand to give you best.
Step 3: Then we use the hair dryer on the lock (Photo 4), preferably is in the average power.
So with all the hair are separated by strands (Guided by the original images of the character, of course) to finish. The design of the more fringe or hair is to your liking.
Be more or less like this (picture 5), although this is only a test, and then bring the photos with the improved wig.
Remember, this tutorial can be used for any person holding the hair with this style.
I hope you have served this little tutorial, questions or suggestions feel free to post them.
See ya!
Image size
900x1566px 315.28 KB
© 2011 - 2024 Somichu
Comments12
Join the community to add your comment. Already a deviant? Log In
bien hecho hermana!!! ayudas a los pobre plebeyos como yo a ser pro como tu!